3 User interface
Use the Engineering Base Explorer to select the layout diagram where the devices are to be arranged. Click on "Select assistant" in the context menu, select "Mounting Rail Assignment" in the assistant selection, and click on Start.
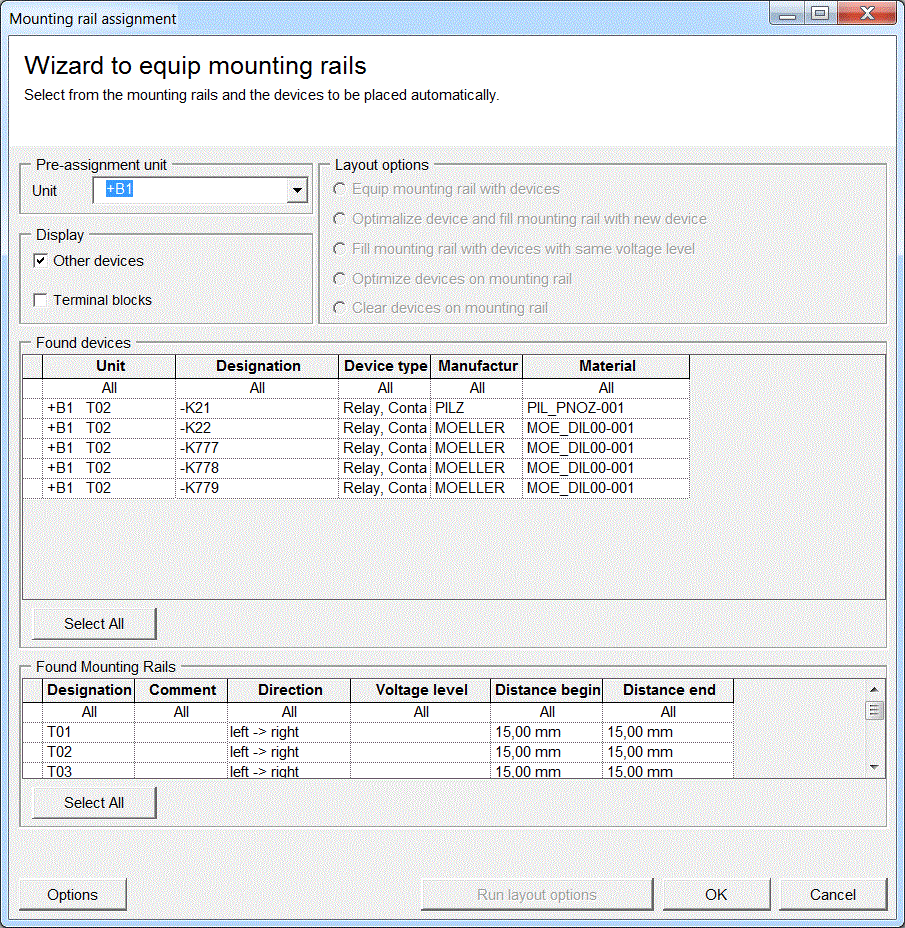
You can use the "Unit" option to restrict the device and terminal selection. For this purpose, devices and terminals respectively must already have been assigned to the corresponding assemblies in the Engineering Base Explorer. By default, the dialog shows the unit to which the layout diagram has been assigned.
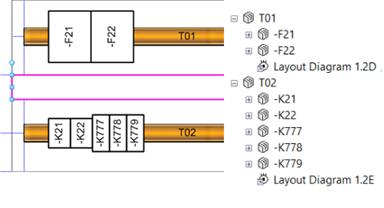
The selection list only shows the devices and terminal blocks not assigned to a mounting rail. When placing the devices and terminal blocks respectively on the mounting rail, the devices and terminal blocks are automatically integrated (aggregated) underneath the mounting rail in the Engineering Base Explorer.
From the selection list "Found Devices" you can select the devices and terminal blocks thereupon to be placed on the mounting rail. The options specified in the "Display" section are taken into account. If the "Other devices" checkbox is activated, then the selection list displays devices. If the "Terminal blocks" checkbox is activated, then the selection list displays terminal blocks. You can combine the two. You can activate several devices and terminal blocks in the selection list by clicking on them. If you want to select several objects at once, then also press and hold the [CTRL] key. The first column then shows by means of consecutive numbers the order in which the devices and terminal blocks respectively were selected. You can select several devices at once by selecting the first element in the list, pressing and holding the [SHIFT] key and then selecting the last element. The objects are then numbered in the order in which they are arranged in the table.

The selected order is later taken into account for the placement of the devices on the mounting rail.
You can use the selection list "Found Mounting Rails" to select the mounting rails where the devices are to be placed. If you want to select several mounting rails at once, then also press and hold the [CTRL] key. The first column then shows via consecutive numbers the order in which mounting rails were selected.

If you have selected several mounting rails, then the devices are placed on the mounting rails in sequence. Once a mounting rail is completely occupied, the next mounting rail from the list is used.
Once the devices or terminals and mounting rails in the selection lists are marked, then the assignment options become active and can be selected. The marked mounting rails are equipped accordingly upon clicking on "Run layout options".
Subsequently the dialog offers the following alternatives:
· You can select additional mounting rails and devices or terminals, or you can execute assignment options.
· You can terminate the wizard by clicking on "OK".
· Upon clicking on "Cancel", you can in a subsequent dialog decide whether or not to undo the changes carried out to this point.
|
|
In the selection lists for devices, terminals or mounting rails, you can specify column widths, show or hide columns and select column sorting options. These settings as well as the size and position of the dialog window remain active when restarting the wizard. |