3.18.7 Creating a New Revision for Projects
The New Revision Wizard for projects helps you in creating a new revision on project level. The wizard is started either if a Zero Revision has to be created from the revision settings of a project, or a revision has to be created from the shortcut menu of a Revisions folder.
To create a new revision for a project
1. In the Engineering Base Explorer, select the Revisions folder below the project.
2. On the shortcut menu, click Create Revision.
The New Revision Wizard for projects opens. The settings made under Revisions in the project properties are shown in the dialogs.
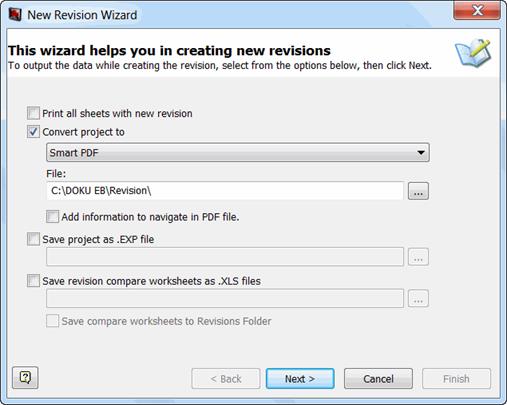
3. Select the check-box of the desired output. A multiple selection is possible.
|
Output |
Meaning |
|
Print all Sheets with New Revision |
All sheets are printed with the new revision index when creating a new revision. |
|
Convert Project to |
Converts the project to Smart PDF-Format. · Select if a Smart PDF or a Smart PDF with Clouds is to be created. · In the file box , enter a folder name or click the · Check the Add information to navigate in PDF file, if you want to navigate within the PDF file. |
|
Save Project as .EXP file |
The project is saved in EXP format in the entered folder. Click the The file name is <project name>_<revision name>. |
|
Save Revision Compare Worksheets as .XLS files |
The changes in worksheets compared with the previous revision are stored as .XLS files. Click the · Click the Save revision compare worksheets to Revisions folder check-box to save the .XLS files in the folder "Released Documents" underneath the Revisions folder. |
4. Click Next.
The Revision details are displayed.
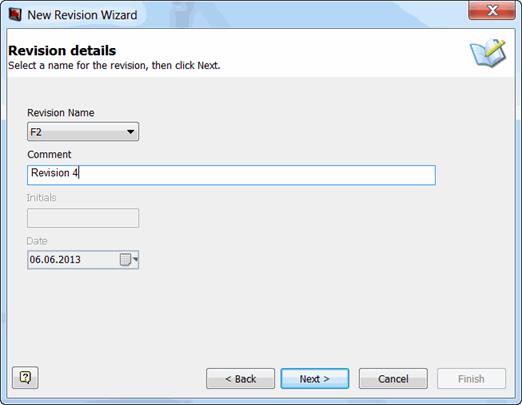
5. In the box Revision Name select the desired revision. The default is the next designation according to the values for the successive revisions entered in the revision settings.
6. In the box Comment enter optionally a comment for the revision.
7. Click Next.
Initials and Date are filled automatically. Initials is defined in the User Information in the Options dialog.
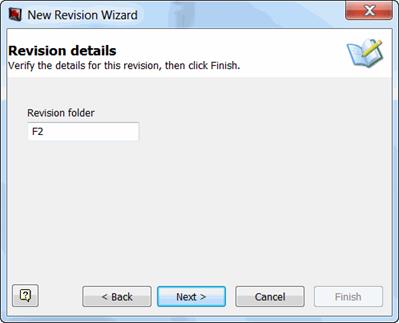
8. As default for the Revision folder where the revision information is saved, the name of the actual revision is inserted. This folder name can be changed.
9. Click Next.
The Revision for Documents dialog opens. Changes can be made in this dialog, when the option Enable Revision Index and Document Version Index was activated in the projects properties.

10. Click the check-box of the desired storage location, where the PDF files should be saved. A multiple selection is possible.
|
Storage Location |
Meaning |
|
Save Sheets as PDF files to |
The sheets marked as changed are saved as PDF files in the entered folder Click the The sheets are stored as PDF files only if the entry in the column "Export to PDF" in the following dialog is not equal to "None". |
|
Save Sheets as PDF Files to Revisions Folder |
The sheets marked as changed are saved as PDF file in the project folder "Released Documents" underneath the folder Revisions. The PDF files are identified as such by the PDF Document Icon serving a better overview in classifying revised documents. In case of the Zero Revision, all documents can be stored in the folder Revision as PDF files. The documents are stored in the same order as in the document section. In this way, it’s easier to find revised documents and to output them once again. |
11. Select the Text Boxes with Clouds check box, if you want modified texts belonging to a shape to be marked each by a so-called change cloud instead of just marking the related shape by a change cloud. This option is enabled only if the sheets or drawings are stored as PDF files into a directory or the Revisions folder.
12. Click Next if the document revision is activated, otherwise click Finish to create the new revision.
If the option Enable Revision Index and Document Version Index is not activated, a new revision is created now.
All documents are displayed in the New Revision Wizard. In order to enable an unambiguous identification of the sheets of a project for this selection, the entire path of the drawing is represented. Apart from the sheet name the drawing path of a sheet in the column Part of (extended) also contains the complete folder structure below the folder Documents, which leads with the starting point Documents to the sheet.
Example:
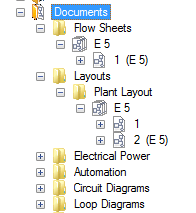
Folder hierarchy in the folder Documents
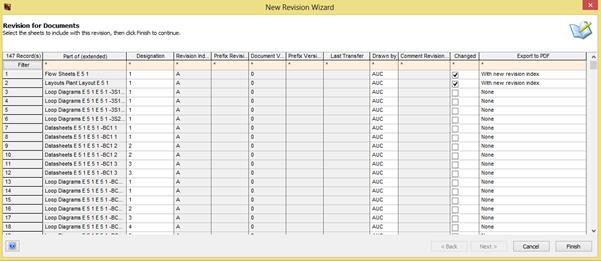
In the following columns changes can be made:
|
Column |
Meaning |
|
Designation |
The name of the document can be changed. This is the name of the drawing, if version number per drawing was chosen. If version number per sheet was chosen, it's the name of the sheet. |
|
Prefix Revision Index / Prefix Version Index |
The prefix of the revision index and version index can be changed. You can choose between the indexes that have been predefined in the projects properties. |
|
Drawn by |
An existing entry can be modified. |
|
Changed |
Modified documents are marked automatically. It is possible to select additional documents. |
|
Export to PDF |
The Export to PDF can be modified for documents marked as Changed: · None: No PDF file is created. · With New Revision Index: The PDF files are created with the new revision index. · With Previous Revision Index: The PDF files are created with the previous revision index. |
13. Make the desired changes.
14. Click Finish, to create the new revision, Cancel to leave the dialog without creating a new revision.